
 This two-part article describes how two products by SSP Innovations, SSP Lifecycle Work (formally, WFM – aka Lifecycle Work) and SSP Lifecycle Assets (formally AssetLife) have become a complete Utility and Pipeline Work and Asset Management System. It’s important to note again, that a key driver for our product direction has been the following diagram depicting a living ecosystem of solutions for managing utility work and assets across the organization.
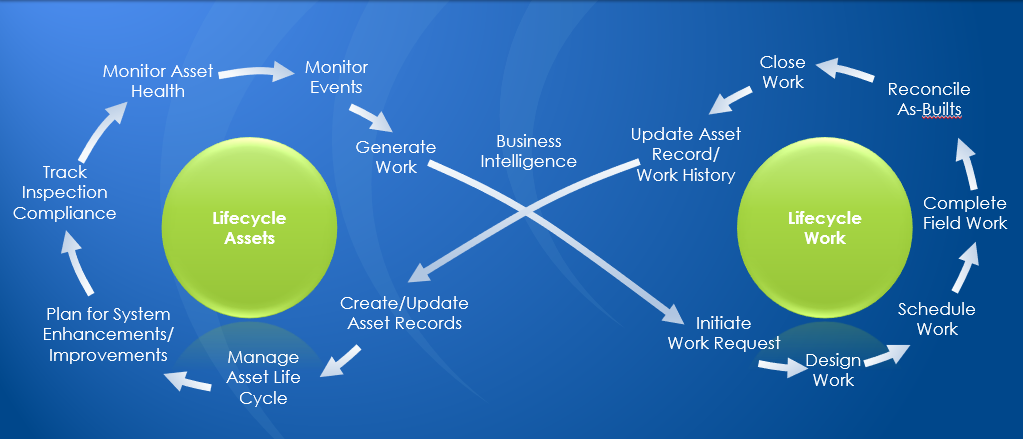
Further, this important ecosystem of solutions was designed for utilities and pipeline organizations *with* utilities and pipeline organizations.
In Part 1, I presented how the lifecycle of work initiates the lifecycle of an asset in SSP Lifecycle. Specifically, how material constructed from a job becomes associated to and updates managed assets in Lifecycle Assets, and how those managed assets are synchronized with GIS updates.
In Part 2, I’ll discuss how the asset lifecycle can be managed, and ultimately initiate new work in the system for asset inspections, repairs or replacements.
Part 2: Managing your assets
Asset Modeling
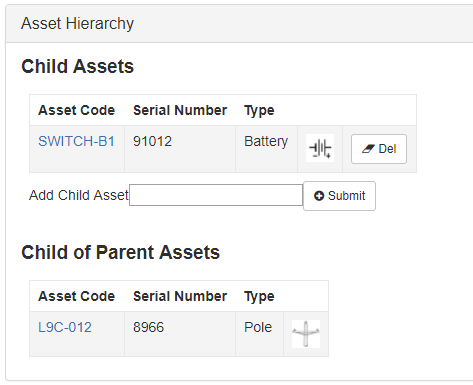
Key to an accurate assessment of how assets operate and perform is knowing their dependency on other assets within the larger, connected facility grid. Further, prioritizing maintenance activities is made more efficient when planners can identify groups of failing assets and schedule accordingly. To this end, Lifecycle Assets has been updated to include the capability to model and view assets as they are modeled, managed, and installed in the real world. For example, this means you can specify a SCADA switch as residing on, or as a child of a pole. Likewise, you might want to add a child asset, a battery, to the switch. So, once an asset has been established in the system, you can define its parent asset, for the purposes of connection or reliance, in the new “Asset Hierarchy” panel. The same can be said for its child assets. The following screenshot shows the Asset Hierarchy panel for a Switch in Lifecycle Assets. Note the pole as a parent and the battery as a child of the switch:
Establishing asset models with Lifecycle Work
When assets in Lifecycle Assets are updated from CU (Compatible Unit)/Material associations within Lifecycle Work (as described in Part 1 of this article), they can optionally be modelled by the system from established parent/child rules according to the estimate/design. For example, work locations in Lifecycle Work estimates commonly group CUs/Material at a location in the design sketch and ultimately the place they’re constructed in the real world. In the following example, a pole containing a three-phase transformer, is at Work Location “1” in a Lifecycle Work job. There are three transformers on the pole at the Work Location (note the Transformer CU with an As Built Quantity of 3):
![]()
Using the Lifecycle Work ‘Asset Association’ task, I can associate the transformers from the as built to three transformers assets already in “Stock” in Lifecycle Assets. Similarly, for non-rotating assets, such as poles, I can create the asset in Lifecycle Assets directly from the Asset Association task. The system ensures my assets are updated according to the actual work being performed and models the assets according to Asset Hierarchy modeling rules. In this case, the transformers can be modeled to the new pole asset when they assets are updated from this job.
![]()
Opening the Asset Dashboard shows the updated three transformers and the new pole (now all in an “Issued” status).
![]()
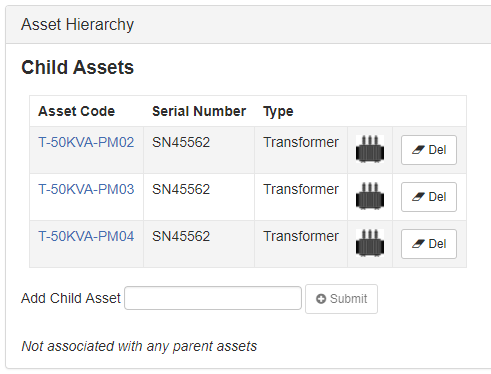
Opening the pole’s asset page in Lifecycle Assets shows the transformers modeled to the pole. Note that there are links to quickly jump to each individual transformer’s asset information:
This example highlights how any asset can be associated to non-GIS records as well as GIS features while still having a seamless integration between the systems. Asset Managers can use the pole for the location of the transformer assets or associate them to a Transformer Bank feature in the asset map. Your organization can determine the rules for modeling, which can be directly inherited by the GIS model or remain independent of the GIS, especially for assets not tracked in the GIS. In the transformer example, transformer assets are associated to ‘TransformerUnit’ records in the GIS, which are not usually represented by GIS features (except in the new, Esri Utility Network). The GIS association with transformer unit records, occur in ArcMap through the same update process we reviewed in Part 1.
Once our assets are properly established and modeled, they’re ready for inspections and maintenance. Being a good, proactive asset manager, I am going to initiate inspections for my assets.
Creating Asset Inspections
Critical to any asset management plan is the need for continual monitoring. Utilities and pipeline organizations must be able to quickly establish both reactive and proactive inspection plans for assets, and those plans must be efficient in order to same time and cost.
Lifecycle allows me to define the inspections and inspection data required for each asset. It also allows me to define the methods for initiating those inspections. For example, I can create an ad hoc inspection plan for my assets by using a map selection or asset data query. I can also schedule the initiation of inspections from asset actions, such as when an asset is created.
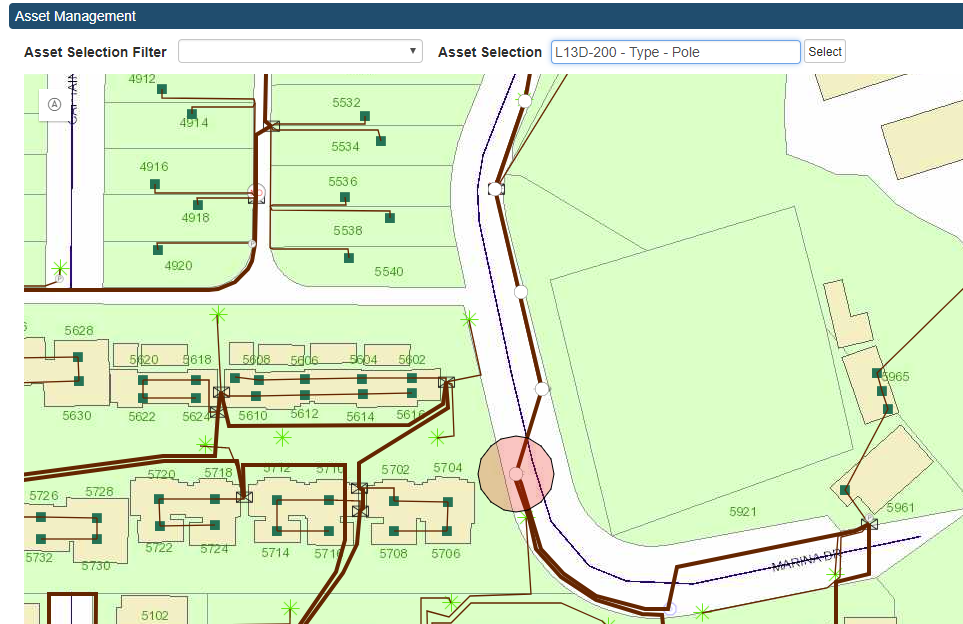
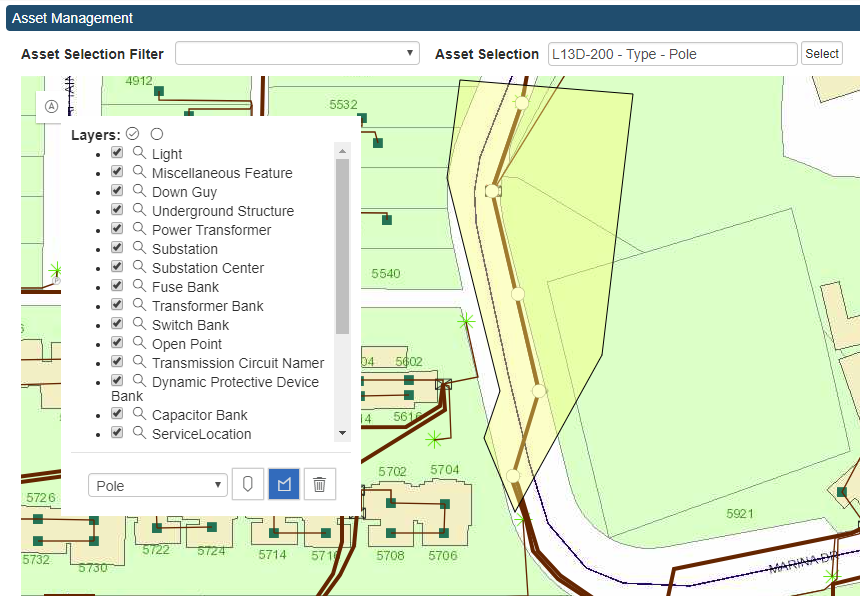
In our map example, I can search for an asset to zoom the map to the location of the asset. In the following screenshot, I’ve used the asset search to find my location, and the asset (the pole) is highlighted in the map after the search:
From the location, I can see four additional poles to the north of my pole that I want to include in my inspection plan. Using the Lifecycle Assets map widget, I can select the poles by sketching a polygon in the map.
When features are selected in the Asset Map, the asset info popup is displayed to the user with the selected features. In the popup, I have the option of adding the selected features to an inspection:
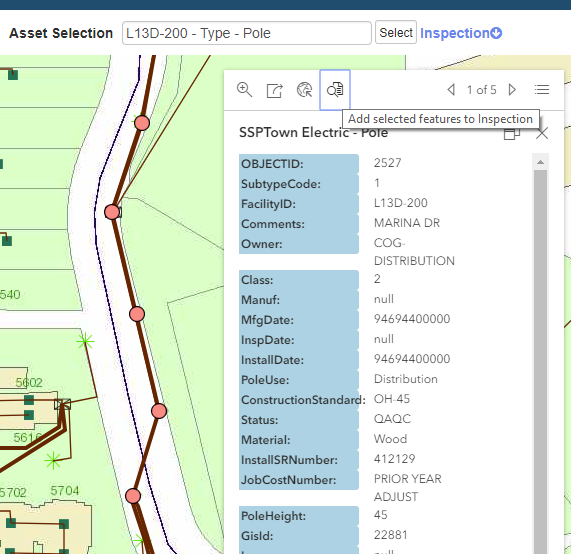
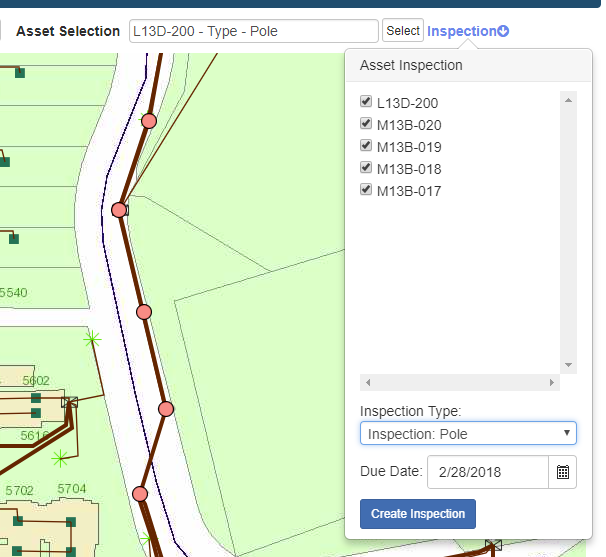
The Inspection link allows me to confirm the selected assets needing to be inspected, select the inspection type, and select a due date:
We’ll review the result of creating inspections within Lifecycle in just a moment. But first well review some other ways to initiated inspections.
For any asset (including non-GIS assets) in the system, you can create inspections from searches in Lifecycle Assets. Running any asset search or query also validates the asset (most commonly by a configured status) to see if an inspection can be created for each asset. For example, in the following screenshot, I ran a search on SCADA switch batteries in our system:
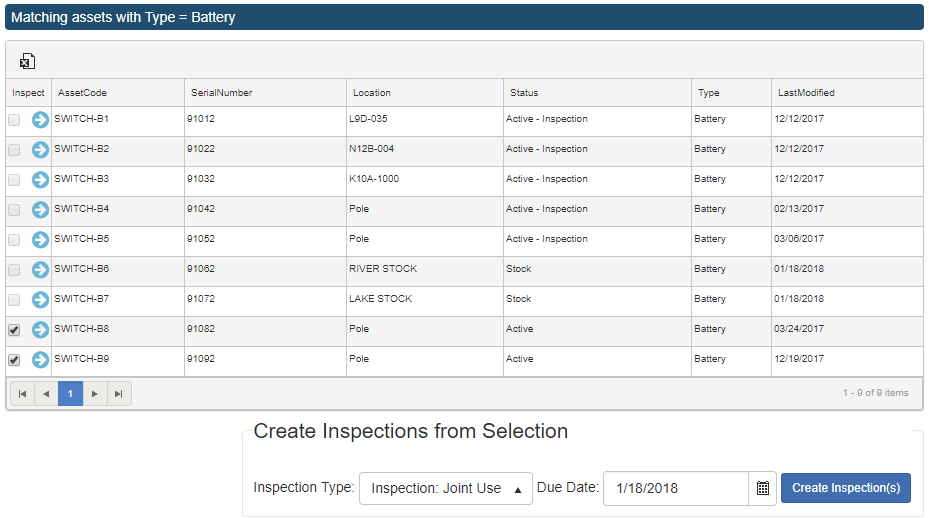
The system validated the results and enabled/disabled the selection boxes next to the asset accordingly. The first five batteries returned by the search are not valid for inspection because those assets are currently being inspected. Two other batteries aren’t valid because they are in “Stock.” The last two in the results can be because they are active in our service territory and not currently under inspections.
Whether you’re creating inspections from the map or an Asset Search, clicking “Create Inspection” creates the inspections as jobs in Lifecycle Work. Optionally, SSP is actively working on the capability to link these inspections together as an “Inspection Plan” or group of assets to be inspected so it can be assigned and tracked as a single work order. Lifecycle Assets will then allow you to add asset inspections to an existing inspection plan. It will also validate whether the assets are already part of an existing inspection plan.
Once the inspection jobs are created they are viewable from the asset’s main page in the “Related Work Requests” panel. In the switch asset example shown earlier, the switch was also installed through a Lifecycle Work job and then updated through an asset association, so you can see the job where it was installed as well as any inspections for the asset in the same panel in the Asset’s main page.
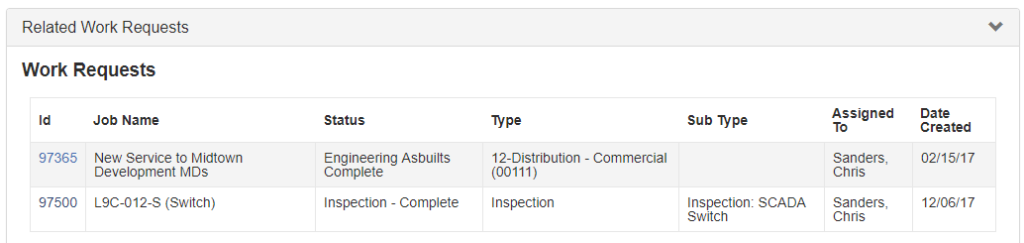
You can click the “ID” link to open the job in Lifecycle Work and view the detailed information.
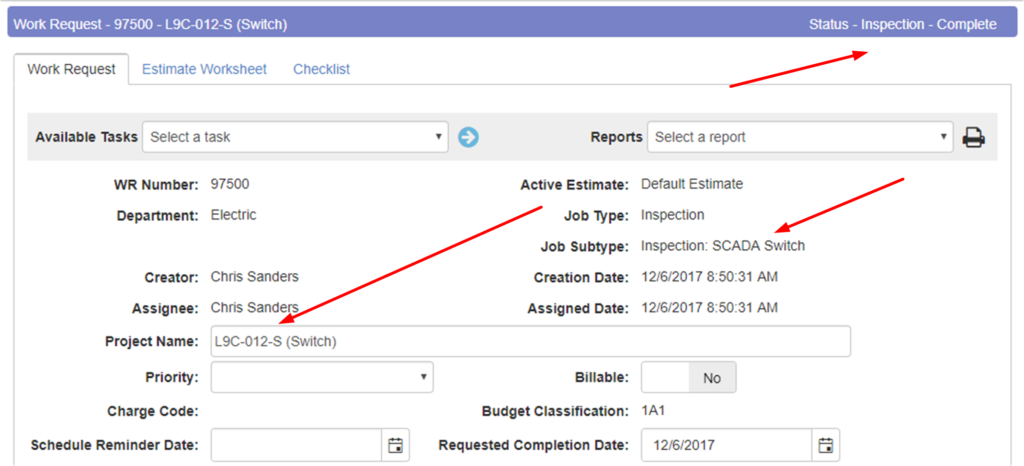
Inspection jobs in Lifecycle Work are linked directly to the asset which is viewable from the job, which also have a link directly back to the asset:

Once an inspection job is initiated in Lifecycle, utilities have a few options for collecting inspection data and getting it back to Lifecycle:
- Send the job to a dispatching system, such as Esri’s Workforce, so the data can be collected using a native GIS field data collections app, like Collector. Read more here, part 1 and here, part 2.
- Send the inspection job to a third-party system for data collection.
- Assign the inspection job in Lifecyle Work to field collection personnel and as a custom extension to Lifecycle, allow the user to collect the data directly in Lifecycle.
Inspection data returned or collected within the Lifecycle Custom extension can be viewed directly in the inspection job in Lifecycle Work or the asset’s main page in Lifecycle Assets. Of course, this data is vital for proactive or responsive asset maintenance plans. Values for ‘critical fields’ returned to Lifecycle can trigger/create maintenance jobs for damaged assets. Further, this data enables Asset Insights giving asset managers the ability to create proactive asset maintenance plans for assets in the service territory having higher risk.
Asset Maintenance
We’ve already covered how the installation of CUs specified in an as built, can ‘Issue’ those corresponding assets to the job. Maintenance operations and jobs managed in Lifecycle Work function similarly. Compatible Units/materials can be specified in a construction as built with a number of different work functions (actions) that can be configured to make corresponding updates to assets. So, like we saw in Part 1, when the GIS is updated (e.g. deleted or abandoned) for a corresponding feature, the asset is synchronized through SSP Tasks and Lifecycle. For example, a transformer in Lifecycle Work with a Work Function of “Return” can be configured to return that asset from the service territory to the “Shop.” Of course, the replacement transformer specified as “installed” in the same work location, can then be “issued” in their place. The previous screenshot shows this example in Lifecycle Work and then Assets:
Inspection and Maintenance Scheduling and Monitoring Asset Health
In a future article we’ll cover our solutions for creating inspection and maintenance schedules for assets within Lifecycle. Additionally, SSP offers services and solutions to bring together all available data sources (i.e. Current Asset, Inspection, Historical Asset, and Environment data) in a model that produces risk posed to active assets in your service territory.
Finally
We hope these two articles illustrate the power of a seamlessly integrated GIS, work and asset management system. Through years of utility and pipeline experience, the SSP Lifecycle ecosystem of applications was designed with electric and pipeline engineers and operations personnel to addresses their specific needs. Our intention is to guide your organization from design to installation to inspection and monitoring to maintenance to strategic system improvement. At SSP Innovations, we care about building applications that work how you work, so you can focus on your job rather than the frustrations of a system that wasn’t designed for what you do.

CONTACT US TO LEARN MORE ABOUT SSP LIFECYCLE:
For more information about SSP Lifecycle, or to schedule an introductory process review and demonstration, please contact Ian Martin.

What do you think?