
In this article, I will demonstrate an easy way to make your application talk to Responder™ by using Responder™ Data Services to get and submit data.
There are many different applications you can build that require you to access Responder™ Data Services, such as custom tools for ArcMap, a standalone data processing application, or a web service for external usage.
There are three ways to efficiently get Responder™ data that we use in our Responder™-talking applications: direct SQL requests against a Responder™ database, built-in requests provided by ArcFM™ API, and custom requests which get executed by Responder™ Data Services.
Data Services Overview
In our case, Data Services is a Responder™ component that executes requests against Responder™ data and bridges our application to the Responder™ server. But like any bridge, it must be pointed to another shore (the Responder™ server) with no restrictions to cross (authentication).
To point to the Responder™ server programmatically, we should initialize the MSMQ channel first:
{
// If we try to register second time we will have an exception
if (NeedToBeRegistered())
{
RemotingHelper.Configure();
AppDomain.CurrentDomain.SetPrincipalPolicy (System.Security.Principal.PrincipalPolicy.WindowsPrincipal);
RxDb.ConfiguratorResolve += new RxDb.ConfiguratorResolveEventHandler(RxDb_ConfiguratorResolve);
}
}
private DataSetConfig RxDb_ConfiguratorResolve()
{
ConfiguratorRequest request = ConfiguratorRequest.RemoteExecute();
DataSetConfig configurator = request.RequestedConfigurator;
return configurator;
}
private static bool NeedToBeRegistered()
{
System.Runtime.Remoting.Channels.IChannel[] myIChannelArray = ChannelServices.RegisteredChannels;
foreach (System.Runtime.Remoting.Channels.IChannel channel in myIChannelArray)
{
if (channel.ChannelName == “msmq”
&& channel.GetType().Equals(typeof(Channels.MSMQ.MSMQChannel)))
return false;
}
return true;
}
The following configuration points the MSMQ channel to the remote server’s private queues:
<system.runtime.remoting>
<channels>
<channel id=”msmq” type=”Miner.Responder.Shared.Channels.MSMQ.MSMQChannel, Miner.Responder.Shared”/>
</channels>
<application name=”IntegrationWebService”>
<client>
<wellknown type=”Miner.Responder.Shared.IDataServices, Miner.Responder.Shared” url=”msmq://FormatName:DIRECT=OS:{ComputerName}\private$\rxserver/DataServices.rem”/>
<wellknown type=”Miner.Responder.Shared.IArchiveServices, Miner.Responder.Shared” url=”msmq://FormatName:DIRECT=OS:{ComputerName}\private$\rxarchive/ArchiveServices.rem”/>
</client>
<channels>
<channel ref=”msmq” ComputerName=”server-name”/>
</channels>
</application>
</system.runtime.remoting>
</configuration>
The following link on the Schneider Electric help page will help you with enabling Message Queueing. At this point, step one of the configuration is complete, but what about authorization?
Responder™ authorizes its requests by the user who executes it, so all we need is to run the request using a user account that is registered to the Responder™ system. We have the choice of doing so by:
- Running the application with user privileges
- Programmatically elevating privileges of the current thread
- Setting up an application pool, if we are using IIS as a code executor.
Let’s skip the first two options, since the internet is full of tips for elevating privileges, and take a look at app pool configuration:
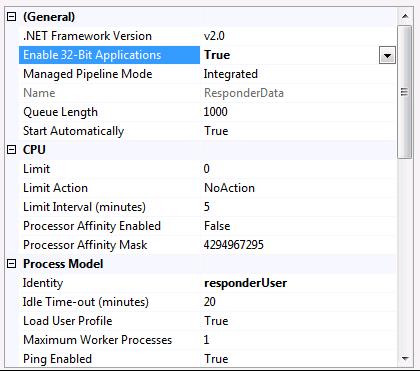
I’ve made simple changes from the default setup to set the .NET framework version to 2.0, enable 32-bit applications, and configure the identity to use a custom user account. Once we set up the channel and executor’s privileges, the Responder™ data services are ready to use. Notice that both Responder™ Services and Responder™ Archive Services have personal service providers:
IDataServices ResponderServices = ResponderServices.GetDataServices();
Built-in API Requests Overview
ArcFM™’s API provides a set of very useful requests that we can use in our application. The notable requests here help to get and update Responder™ data, find data using filters or identical fields, get objects and all related data, and use specific device finders.
What is a request and how do we execute it? Let’s pretend we are interested in getting some incident information. To get information on an incident we can use the FindIncidentAndRelatedTablesRequest class. Below is a short example of the request usage for doing so:
var request = new FindIncidentAndRelatedTablesRequest(IncidentID);
//Execute request
request = (FindIncidentAndRelatedTablesRequest)ResponderServices.Execute(request);
//Use requested data
DataSet data = request.RequestedDataSet;
//Parse requested data
if (data != null)
{
if (data.Tables.Contains(RxDb.Tables.Incidents) && data.Tables[RxDb.Tables.Incidents].Rows.Count > 0)
{
var incident = new IncidentsObject(data.Tables[RxDb.Tables.Incidents].Rows[0]);
//use incident object
}
}
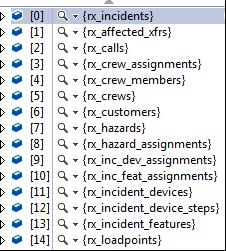
The request constructor gives us a choice of parameters to use such as a single ID, list of IDs, and a “where” clause to execute against the incidents table. In the example above, I only used the incident information, but note that the requested data set contains all related data to incident tables such as calls, customers, devices, etc.
Here is a screenshot of the run-time content in which the data set contains a list of tables:
Submitting data to Responder™ is little bit more difficult than getting the data. Here is an example of creating a new call and submitting the data to Responder™:
CallsSchemaRequest callsSchemaRequest = new CallsSchemaRequest();
callsSchemaRequest = ResponderServices.ExecuteRequest(callsSchemaRequest);
//set up a new call
DataSet dataset = callsSchemaRequest.RequestedSchema;
DataTable callTable = dataset.Tables[RxDb.Tables.Calls];
DataRow call = callTable.NewRow();
//set call fields
call[RxDb.Tables.Calls.Remarks] = “Call comments”;
//add new call, submit to Responder™
callTable.Rows.Add(call);
Submit(dataset);
//analyze created call
AnalyzeCallsRequest aCRequest = new AnalyzeCallsRequest(new int[] {Convert.ToInt32(call[RxDb.Tables.Calls.ID])});
ResponderServices.ExecuteRequest(aCRequest);
After submitting the data to Responder™, Responder™ will then create a new call and incident just as it happens when a dispatcher is submitting a call using the Responder™ website. The submitting process populates Responder™ tables with all necessary fields.
Also, you’ve probably noticed that I used a static ResonderServices object instead of creating a new instance of the DataServices class.
Custom Requests Overview
What if you cannot get (or set) all information using a built-in request, and you don’t want to use direct SQL querying? This is where a custom request comes in handy, which will help you process data. Basically, custom requests execute your custom code and then return the data.
So what is the difference between using a custom request and using a simple data processing function? The main distinction is that the custom request is being executed by Responder™ Data Services on the server side.
There are many advantages to this method: you don’t need to give database access to the client application, data processing is executed on the server side (which could be faster depending on your system configuration), regular Responder™ authorization is used, and finally, there is no need to pass all data via the network.
Let’s create a custom request and execute it. First of all, we need a request class to do so:
[UseQueryServices]
public class GetRegionsDictionary : IDataRequest
{
public Dictionary<string, string> Regions = new Dictionary<string, string>();
public void Execute(DataSource source, DataSession session)
{
string queryString = “SELECT REGION_ID, REGION_NAME FROM RX_REGION_MODE_ASSIGNMENTS”;
DbSql query = new DbSql(queryString);
DataSet data = source.ExecuteDataSet(session, query);
Regions = PopulateRegions(data);
}
}
This request simply executes a query against the Responder™ database and then populates the dictionary with data using some of the PopulateRegions function rules. Additionally, you can add request constructors to pass parameters.
The main idea is that you can create whatever data processor you want, execute it on the server side, and then return only what you need. To make this code available for Data Services, you will need your compiled library, which should be located in your Responder™ Server folder as well as in your app references.
Now we are ready to call the request by completing the same steps as we did for built-in requests:
GetRegionsDictionary request = new GetRegionsDictionary();
//execute request
request = ResponderServices.ExecuteRequest(request);
//use returned data
Dictionary<string, string> regions = request.Regions;
Here in part 1, we covered some simple methods of how to connect an application to Responder™ Services. In the next part, I’ll share with you some of my ideas and issues that I came across during the conversion of some of the most popular Responder™ objects to a MulltiSpeak format.

Vera Lei says:
Hi: in app.Config to WCF? Thanks so much.
I’m request to rewrite our existing web service, which connect the Responder Service, to WCF. Any idea how to replace the section of
Vera
Konstantin Korchakov says:
Hi, I believe you could copy channel configuration section from app.config to WCF web.config file. In my case that worked well without any issues and I used the same config sections for all .NET applications including wcf services. Thanks!
Jolly says:
Hi,
When I am using Responder assemblies, it gives me following error:
{“The queue does not exist or you do not have sufficient permissions to perform the operation.”}
Can you please help me with the same. It is just a great Blockage.
Thanks,
Jolly
Konstantin Korchakov says:
Jolly,
Most likely MSMQ not configured properly or your application cannot access queue on your client machine, from which you use responder assemblies, or on a server machine. I would recommend to check installation of MSMQ services and check if you have system priveleges to read/write private queues; you can find more information on how to install MSMQ for Responder in online documentation.
Thanks!