INTRODUCTION
In April 2017, SSP announced our new investment partner Warren Equity Partners. This arrangement introduced the first work opportunity with our sister company HydroMax USA. HydroMax specializes in the data collection and condition assessment of water, wastewater, and gas municipal infrastructure.
This initial project involved the replacement of HydroMax’s existing Trimble-based field survey data collection process with Esri’s Collector and Survey123. Esri’s Workforce application was also leveraged to assign individuals/crews to field collection work.
WORKFLOW
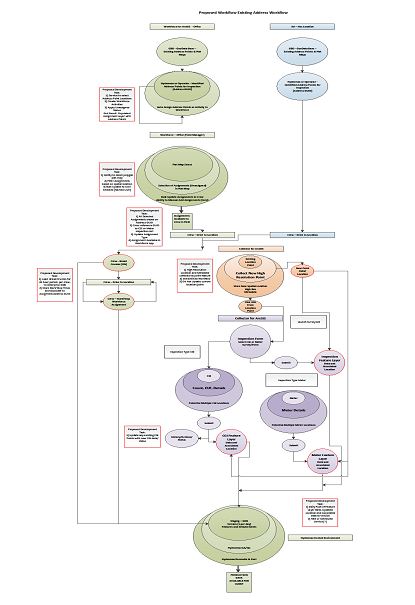
The proposed workflow was initially documented (Figure 1). With the provided solution, crews will either be assigned location points through Workforce for ArcGIS or can travel to an “ad-hoc” location point. In the case of Workforce assignments, back-office dispatchers assign field crews physical locations for inspection. Assignments are bulk populated into Workforce from existing address/location point features. Assignments can be bulk assigned/un-assigned to a crew based on a plat location or be individually assigned.

Figure 1
Upon assignment or determination of an “ad-hoc” location, the crew will travel to the existing address. At the location, crews will utilize Collector for ArcGIS to establish new high-resolution data inputs and metadata. The new point will not be displayed, but instead the user will select the existing point (and click the URL) to launch the Survey123 inspections workflow. Inspection workflows start with a generic inspection form and can branch into either a CGI form or Meter Inspection form. Upon publishing, the stored GPS data will be used to update the existing point and associate all inspection data to the parent record.
In the event the address is new (i.e. no existing point data exists), the process involving Workforce is eliminated and the point collected by Survey123 will be used as is instead of updating the source data.
REQUIRED TOOLS
With an established workflow, it was determined how ArcGIS Online would be leveraged to create the assignments and subsequently assign them. Normally in Workforce, one must click the add assignments button and fill out the form for every assignment. Although there is nothing wrong with this approach, it may be time consuming to assign a large number of addresses for inspection. The exact same thing can be said about assigning several inspections to the end user.
In a previous blog post, it was discussed how Web AppBuilder for ArcGIS can be used to add out of the box (OOTB) functionality to an online instance. While the OOTB Web AppBuilder is capable of solving several problems, there are some tasks that are difficult to accomplish. Mass creating a large number of Workforce assignments is one such example that would be better served with some deeper customizations. This is where Web AppBuilder for ArcGIS (Developer Edition) comes in. Even though the name is similar to what is already built into ArcGIS online/portal, there is the distinct difference of enabling custom code to be enabled in web apps.
Before customizing the desired functionality, the custom app environment must “Talk” to ArcGIS Online. From the Web AppBuilder for ArcGIS (Developer Edition) homepage, the SDK is downloaded to supply everything required to run custom web apps. Once downloaded, the files are extracted to the desired location (i.e. C:\ drive). An additional custom code requirement is Node.js.
WEB APPBUILDER SPECIFICS
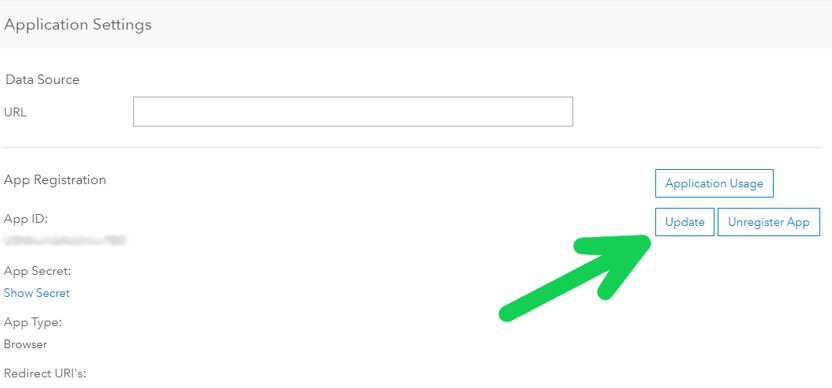
Now that prerequisites are in place to begin Web AppBuilder customization, the startup.bat file may be used. This file will start Web AppBuilder on the workstation at http://[machinename]:3344/ Web AppBuilder. It should automatically launch the site when the script is initiated. As shown if Figure 2, the address for ArcGIS Online or a Portal instance and AppID will be required. The AppID is found on the settings tab of a Web AppBuilder Application. By clicking Update or Unregistering and Registering the application, the URI is redirected.

Figure 2
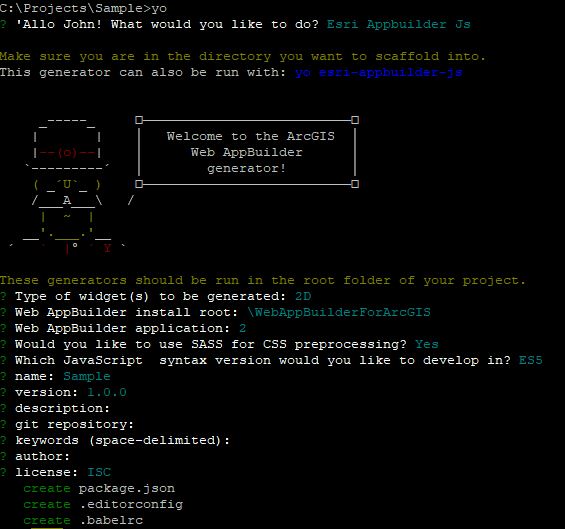
Once the AppID has been supplied, the Developer Edition of Web AppBuilder will be ready to produce the project that will eventually be the Custom widget. A convenient tool exists that produces the initial folder structure required to run the application correctly. Installing the tool is easy if node.js has been installed. Using the Node Package Manager (npm) command we can install the tool by running the command line shown in Figure 3:
npm install -g yo
npm install -g generator-esri-appbuilder-js
The new directory may now be produced to house and navigate to the project. Subsequently, running the command, yo esri-generator-js, will start the project creation process. As stated on the Esri github page, “It’s time to answer the man’s questions!”. Note that it is best to create an app in the Web AppBuilder instance prior running this command to avoid having to configure anything afterward.
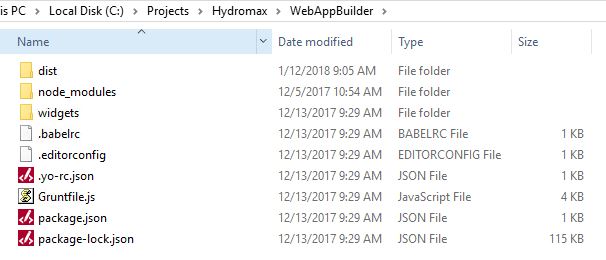
The final step for the creation a custom widget is to run another generator, Yo esri-appbuilder-js:widget (Figure 4).

Figure 3
Specifically looking at what this generator created, in the root of the project there will be some standard node.js project files. Assuming the app was created before running the project generator there is nothing to subsequently change.

Figure 4
Digging further down into the project structure there is the widgets folder, containing widgets. There will be a folder within the widgets folder that has the same name supplied to the generator. Inside this folder will be all the code files for new, custom widgets. A widget is much like a web application in that it has the foundation (HTML and CSS files) for defining user interface (UI) elements.
Like the finest barista in getting the morning initiated, we now possess the necessary scaffolding to begin coding. A future Part 2 of this series will discuss the coding and finalization of our custom widget.


What do you think?