This is the final installment of the three-part series on the creation of a custom ArcGIS Online widget. The first part laid the coding foundation. The second part added some “meat” to the coding effort.
In both parts, there were references to the user interface (UI). The Widget.html file defines this UI via html and consists of a table and a button. The button is assigned to the onclick:onClickCreateWorkforce event (Figure 1) using data-dojo-attach-event.
<div>
<hr>
<table class=’result’ id=’createResults’></table>
<table class=”buttons”>
<tr>
<td class=”button”><button data-dojo-attach-event=”onclick:onClickCreateWorkforce”>Create Assignments</button></td>
</tr>
</table>
</div>
The final piece to tie everything together is the configuration of the widget. By default, layers created by workforce consist of names composed of long alpha-numeric variables. Via the config.json file, it is difficult to programmatically determine the dynamic name (changes on consecutive runs). Custom Web Appbuilder Widgets provide more simplistic configuration functionality. When the widget is added to the application through Web Appbuilder, a settings page appears. The files necessary to define these settings are located within the settings folder.
Within the settings folder there is the file nls/strings.js. Inside this file (Figure 2) represents just a list of variables to store some text values.
define({
root: ({
assignmentsLayerIdText: “Set Assignments Layer ID:”,
addressLayerIDText: “Set Address Layer ID:”,
})
});
Also contained within the settings folder is the file Settings.js (Figure 3). The function setConfig is used when the settings page is first loaded and is only there to provide default values for the configurable values. The function getConfig is subsequently used within Widget.js in order to retrieve the values established on the settings window.
define([
‘dojo/_base/declare’,
‘dojo/dom-construct’,
‘dojo/dom’,
‘dojo/on’,
‘jimu/BaseWidgetSetting’,
‘dojo/domReady!’
],
function(declare, domConstruct, dom, on, BaseWidgetSetting) {
return declare([BaseWidgetSetting], {
baseClass: ‘assignments-from-points-setting’,
postCreate: function(){
//the config object is passed in
this.setConfig(this.config);
},
startup: function() {
var self = this;
},
setConfig: function(config){
this.assignmentTextNode.value = config.assignmentsLayerIdText;
this.addressTextNode.value = config.addressLayerIdText;
},
getConfig: function(){
//WAB will get config object through this method
return {
assignmentsLayerId: this.assignmentTextNode.value,
addressLayerId: this.addressTextNode.value,
};
}
});
});
Finally, like the Widget.html, the Settings.html (Figure 4) is simple. This html file is used for defining the ui of the settings page. In this example it contains two text boxes to input the configuration values defined in settings.js.
When everything is in place to build the custom widget, it is time to take a test drive. Open a command prompt, navigate to the project’s root, and run the command grunt. This will start the grunt process which executes tasks defined in the gruntfile.js. This set of tasks prepares a folder containing the deployable widget as well as copies this deployable to the local WebAppBuilder setup in part I.
The gruntfile.js file was setup correctly as part of the generator after completing the required tasks and going into a waiting mode. Once in the waiting/standby mode, Grunt will ‘listen’ for any changes to files and automatically run if it detects a change as long as the grunt process is running. Now the custom widget is finally ready to use!
Going back to the WebAppbuilder setup earlier….As shown in Figure 5, the new widget will appear as part of the widget list when adding a new widget to the application (look for the friendly guy which is the default icon).

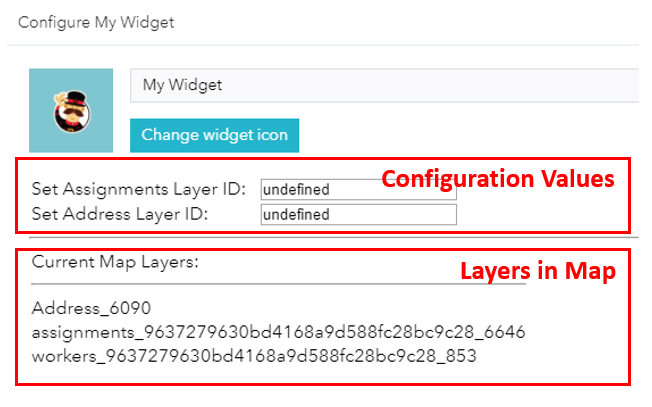
When the widget is added to the application, the first thing to appear will be the custom settings screen (Figure 6). The configuration values are set in the text boxes. Below the configuration values are a list of all the layer names in the map.

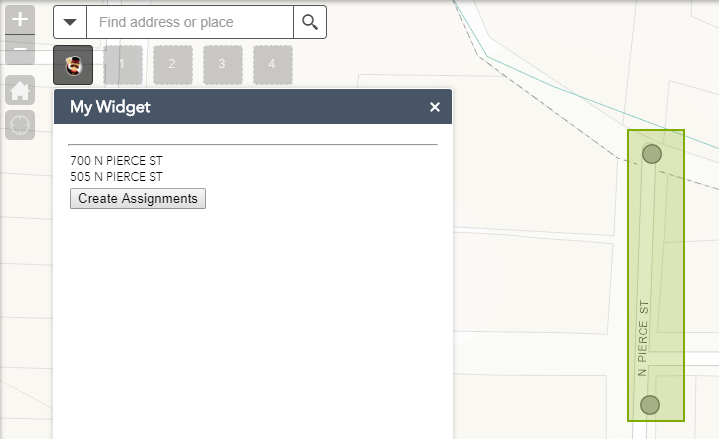
After configuring the widget and adding to the map, it is now time for a first test run. Clicking the widget should open the widget’s UI and activate a drawing event (allowing a rectangle selection box to be drawn). As shown in Figure 7 below, the selection has been made over two addresses, thus populating the table in the UI with a list of those addresses.

Upon clicking the “Create Assignments” button to add those addresses as the location of new workforce assignments. The shape of the points will appear to change, but that is just workforce assignments being rendered over the address layer.

Subsequent navigation to the project within the workforce web interface will show these two new assignments (Figure 9).

This is just one example of what is possible using Esri’s Developer edition of Web Appbuilder. Through using this tool, the entire range of functionality provided by the Esri Javascript API {link to https://developers.arcgis.com/javascript/3/jsapi/} is available. Hope the series was enjoyable!


What do you think?