I have a simple exercise that addresses a sizable percentage of the skills required for Fiber Manager™ digitizing.
This exercise is called the Flux Capacitor, and can be used to train new employees and/or test new implementations and fiber favorites.
It is simplistic by design, and is by no means an exhaustive training document.
Have your new staff conduct the following procedure:
- Load a standard fiber project (*.mxd) or ArcFM™ Stored Display.
- Start an editing session either via ArcGIS methodology or ArcFM™ Session Manager.
- Using the ArcFM™ digitizing technique, place a Patch Location from a previously created ArcFM™ Favorite. Name this Patch Location “Point A”.
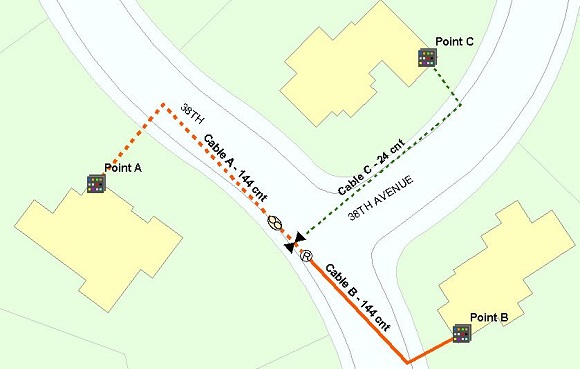
- Digitize two additional Patch Locations as a “Point B” and “Point C” as shown in Figure 1.
5. Digitize a Fiber Optic Cable from Point A to Point B as shown in Figure 2.
6. Digitize a Splice on Cable A. Verify that the cable splits into two (excellent test on an Autoupdater), and name the southern half “Cable B” (Figure 3).
7. Digitize a “Cable C” from the Splice to Point C as shown in Figure 4.
8. Using Connection Manager, make the necessary connections to enable tracing and/or circuit creation for the following routes: Point A to Point B, Point A to Point C, Point B to Point C, and Point A to Point C going through Point B.
9. Observe the Glass Length and Length Source attributes of Cable A (Figure 5).
10. Digitize a slack loop on Cable A (Figure 6).
11. Observe the impact of that slack loop to the glass length based upon changes to length source (see Slinky Associated Post).
12. Digitize a Riser on Cable B (Figure 7).
 13. Change the southern half of Cable B to Overhead (or Underground).
14. Utilize the reporting tools on the Fiber Manager™ Toolbar, as desired.
To conclude, the Flux Capacitor not only makes time travel possible. It also provides a non-complex training tool and test plan.
Will this solution change how you work with ArcFM™? Tell us your thoughts in the comments below!


What do you think?